
TRACC 2.1 Product Tip, NeTEx Fare Importer and Exporter
Why might this be useful?
It is a European standard for digitally recording fares data giving you the option to consider current or future travel costs on a stop-to-stop basis. There are also editing features so you can make up-to-date fare changes based on original real-time data using a format that is widely used across regions. The opportunity to export the data also means outputs can be shared with non-TRACC users and support major transport scheduling decisions.
Follow the below steps on NeTEx Fare Importing and Exporting.
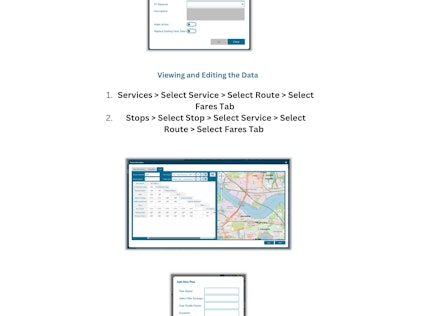
Importing The Data
- 1 Step 1: Import a TXC network of your choosing. NeTEx Fare data is supplied as an .xml file, where there can be many with each file corresponding to a different Ticket Type and Fare Pass.
- 2 Step 2: In the PT Network Tab, select ‘Import Fares’ from the ‘NeTEx’ dropdown
- 3 Step 3: Select the fare files you wish to use – this can be any number, simply highlight the files you want to include.
- 4 Step 4: Select the PT Network to update
- 5 Step 5: Turn on ‘Make Active’: Replace Existing Fares Data Additional files can be uploaded later on. Activating this option will overwrite any existing fare data or changes made if re-importing original NeTEx files
- 6 Step 6: (Optional) Select ‘Replace Existing Fares Data’
- 7 Step 7: Click OK
Exporting the Data
There are two formats NeTEx fare data can be exported to; XML and Excel. NeTEx fare data cannot be exported when saving out a whole network to TXC, as this format cannot store fare data. This is only possible for GTFS export.
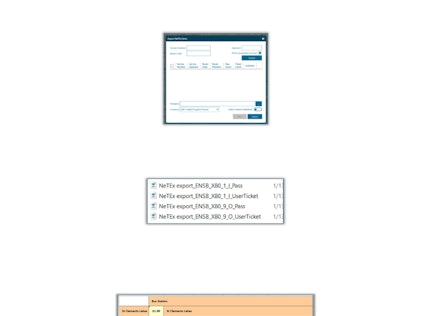
- 1 Step 1: In the PT Network Tab, select ‘Export Fares’ from NeTEx dropdown
- 2 Step 2: Select the network to update
- 3 Step 3: Click OK
- 4 Step 4: Search the service(s) to export
- 5 Step 5: Choose a location to save NeTEx fare file - Currency Option to choose a currency to export fares against
- 6 Step 6: (Optional) Choose currency to export fares
- 7 Step 7: Click OK
- 8 New .xml fare files will appear in the pre-selected directory, which can be uploaded into a new network at a later date.
Export to Excel
Export Fares to Excel Allows you to export (fares only) to an Excel file, which can be done from the Timetable window
- 1 Step 1: In the Timetable view, select the ‘Export Fares to Excel’ icon
- 2 Step 2: Choose a location to save the excel file – this only saves for the route being viewed at the time.
- 3 Step 3: Open NeTEx Fare .xlsx
- 4 Here you can further edit the fare data outside of TRACC; this will not affect any data previously imported in TRACC or vice versa